ADS uses Domain Name System (DNS) to
locate resources on a network. Without a reliable DNS infrastructure, domain
controllers on your network will not be able to replicate with each other, your
clients will not be able to log on to the network, and Microsoft Exchange
Server will not be able to send e-mail. Essentially, if your DNS implementation
is not stable, your Windows Server 2003 network will fail. This means you must
have a thorough knowledge of DNS concepts and the Windows Server 2003
implementation of DNS if you are going to manage a Windows Server 2003 Active
Directory environment.
We have installed DNS Server during
the ADS configuration wizard. But if you have skipped the configuration of DNS
Server at that moment see our previous article to install it from control
panel.
To
configure DNS server
Click on start button select
administrator tools and click on DNS

If you do not see the DNS option in
Administrator tools sub menu it means you haven't installed it. See our
previous article to installed it.
In left pane expand the Server. Here
you can see default forward and reverse zone which were configured during the
ads configuration. Delete the defaults zone files.

Make sure you remove both forward
and reverse lookup zone files before start configurations
Now we will create new forward and
reverse zone file for DNS.
Right click on forward lookup zone
and select new zone files

Click on next on welcome screen

Select primary zone.
We need not to store zone in ADS so Remove check mark from Store the zone in Active Directory
We need not to store zone in ADS so Remove check mark from Store the zone in Active Directory

Give a relative name for this zone
file. For local network we suggest you to give your domain name for this zone
file.
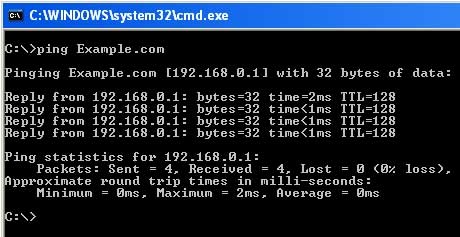
Our domain is Example.com so I set
Zone name to Example.com

We are creating first zone So select
Create a new file with this file name, do not change default name just click on
next

We are going to use this DNS server
in local network so select Allow both nonsecure and secure dynamic updates.
Don't use this option in public network.

On summary table just click on
finish

Configure
Reverse Look up zone
We have configured Forward look up
zone. Now we need to create Reverse look up zone before we use it.
Do Right click on Reverse Lookup
zones

On welcome screen click on Next

Select primary zone.
We need not to store zone in ADS so Remove check mark from Store the zone in Active Directory
We need not to store zone in ADS so Remove check mark from Store the zone in Active Directory

Give the network ID from the IP
address of server. Our server IP is 192.168.0.1 so I will set here 192.168.0 [
network partition of IP]


Select Allow both nonsecure and
secure dynamic updates. Don't use this option in public network.

On summary table just click on
finish

We have created both zone file for
DNS server. Now we need to tell DNS server about our pointer for DNS server.
Expand Reverse Lookup Zones and
select 192.168.0.x Subnet [ if you have used different ip for server then here
you will find your IP address's subnet ].
Right click on it and select New
pointer


At this point we have configured
both forward and reverse lookup zone. But all these effect will take place
after restart of DNS. DNS service can be restart in two ways either by
restarting the service or do a complete restart of server.
To restart the DNS service Right
click on Server and select restart from all task

Configuration of DNS server can be
verify by launching nslookup. To launch nslookup right click on Server and
select nslookup

If you see the default server name
in output mean DNS server has been properly configured and functioning. But we
haven’t restarted the server so you will not see the server name here.

To apply all these change Restart
the server, After Restart verfiy it again and you will see default server name
in nslookup

No comments:
Post a Comment