Your connection is not private. Attackers
might be trying to steal your information from ….. (for example, password,
messages, or credit cards)


If
you are repeatedly facing Your connection is not private
error in Google Chrome Browser then I can truly understand your pain because I
have also faced this error a week ago while browsing the Web.
Since, the Internet fraud
and cybercrime
are some of the most common things these days. So, we all care about our
privacy too much and always want to protect our personal information from the
envy eyes. That’s why, whenever we see the error message like “Your
connection is not private” then we feel bad and want to fix it as soon as
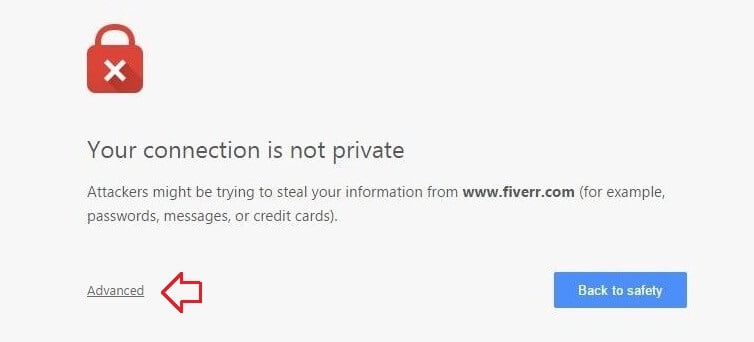
possible. Last week, whenever I tried to log into my Fiverr account using Google Chrome, I get an error message that says:
Your
connection is not private
Attackers
might be trying to steal your information from www.gmail.com (for
example, passwords, messages, or credit cards).
NET::ER_CERT_COMMON_NAME_INVALID
After
few basic searches on the web, I got the reason behind “Your connection is not
private” error in chrome and how to fix it. Here’s the
detail information:
What is “Your connection is not private” Error in Google
Chrome?
Basically,
“Your connection is not private” or “Net::ERR_CERT_DATE_INVALID” error appears
on screen due to the SSL error. SSL (secure sockets layer)
is used by the Websites to keep all the information you enter on their pages
private and secure. If you are getting the SSL error Net::ERR_CERT_DATE_INVALID
in Google chrome, it means your Internet
connection or your computer is preventing Chrome from loading the
page securely and privately.
I
hope, now you are well familiar with – what is an SSL connection error?
Now, let’s know Why SSL error or “Your connection is not private” error occur
in Google Chrome?
Why SSL errors occur?
There
is various reason of SSL errors occurrence, but some of the most important
reasons why SSL warnings occur are:
- The certificate is not issued by a recognized third part: Certificate creation is not a tough job, anyone can easily create SSL certificate. That’s why, Google Chrome examines to see whether a site’s certificate came from a trusted organization or not. If the site’s certificate is not detected from a trusted organization then Google Chrome can’t provide the access.
- The site’s certificate is not up-to-date: In case, the site’s certificate is from a trusted organization but not up-to-date from a long time then Google Chrome cannot verify that the site is still secure and private.
- The connection between the browser and the website might not be secure: Sometimes, it happens due to the unsecure combination of the Internet connection between the browser and the website.
Now,
if you are quite clear with the terms – what is an SSL connection error? And
Why SSL error or “Your connection is not private” error occurs in Google Chrome?
then let’s know the methods to fix your connection is not private error in
chrome.
How to Fix “Your connection is not private” Error
You
haven’t to perform any complex settings in order to fix “Your connection is not
private” in chrome. Only you have to check and fix the issue due to which your Internet
connection or your computer is stopping Google Chrome from loading
the page privately and securely. Here’s how:
Method 1:
Check the Date and Time
In
most of the cases, computer’s inaccurate date and time are the biggest cause of
an SSL error or “Your connection is not private” error message. If you want to
get rid of Google Chrome “Your connection is not private” error message
then update your device’s clock. Once you corrected the date and time on your
PC, you will not face this error again.
Method 2: Check
the Antivirus Software
If
your computer’s date and time are up to date, but still you are facing the
privacy error “your connection is not private” then you need to check the antivirus
software installed on your computer. Sometimes antivirus programs
block the website’s security certificate and in result you face “your
connection is not private” error on Web browsers. Here’s what to do:
- If you have installed the Avast Free Antivirus to protect your PC then you will have to turn off HTTPS scanning in Avast. To do so, go to Settings → Active Protection → Web Shield → Customize, and finally uncheck the “Enable HTTPS scanning” box.
- If you are using Bitdefender antivirus software to get the best real-time security for your PC then you need to turn off SSL scan. To do this, firstly open the main interface of Bitdefender and then go to Settings (which is located at upper right corner). Now from there, click on Privacy Control → Antiphishing tab → turn OFF the Scan SSL.
Method 3: Clean
Google Chrome Browser
If
above-mentioned methods don’t work for you then somehow cleaning the junk from Google
Chrome Browser can help you. To delete the cache, history, and other
browser data from Google Chrome browser:
- First of all, go to Settings → Show advanced settings → Clear browsing data under Privacy options.
If
clearing browsing data doesn’t help then you can reset chrome browser settings to
the default browser settings too. To reset your Chrome browser settings:
- Firstly, click on the Chrome menu → Settings → Show advanced settings → Reset settings → Reset.
Clearing
chrome cache and removing unwanted Google Chrome extensions also helps you a
lot in such situation. Here’s how:
Method 4: Proceed
to the Site
If
you’re sure that the site you attempting to login is secured then you should
proceed to the site. Because, if Google Chrome says that the security
certificate is from the same domain you are attempting to login, it means there
is nothing to worry about when the error appears.
- To proceed, firstly click on the “Advanced” link.
- After that select “Proceed
to <website link> (unsafe)“.

Method 5: Prevent
Warning
Addition
to all these things, if you want to prevent the warning then you can easily set
to prevent warning for a particular period. To prevent warning in Chrome:
- First of all, type chrome://flags” in the address bar and then press Enter.
- Now scroll down towards the bottom and find “Remember decisions to proceed through SSL errors for a specified length of time.” option.
- Once you find it, now from the
drop-down menu select the desired setting according to your wish.

- After selecting, whenever next time you receive the “Your connection is not private” error in chrome then select Advanced → “Proceed to <website link> (unsafe)“.
- Once you completed these steps successfully, you won’t be interrupted with the Google Chrome your connection is not private error message again for selected time period (the preventing time you selected from the drop-down menu).
Important Note:
Apply this method (Method 5: Prevent Warning) only if you’re sure that the
websites you are attempting to login is secured and will not make any
disturbance of the Internet connection between the browser and the website.
How to Fix “Your connection is not private” Error on Android
If
you have successfully solved Your connection is not private Google chrome error
on your desktop computer or laptop but you don’t have any idea that how to fix
Google chrome Your connection is not private error on Android devices
then you might feel a little worried.
But
don’t worry, the methods to bypass Your connection is not private
net::err_cert_authority_invalid chrome error in Android are not too much
different from the methods for computer. Follow this step by step guide and
make your connection private on Google chrome very easily:
Lots
of Android users find this SSL connection error solving guide helpful for them
and perfectly solved Your connection is not private error on Android phone and
tablet.Try out and let us know your point of view.
Conclusion
Thus,
you can see how simple is to fix “Your connection is not private” error
in Google Chrome. Apply
these methods one by one on your Computer and let us know which method worked
extremely well for you. Let us know – if have another appropriate way to fix
error “Your connection is not private” in Chrome.


