Linux is regarded as one of the most secure operating systems you can use today, that is because of its illustrious security implementation features such as SELinux (Security-Enhanced Linux).

For starters, SELinux is
described as a mandatory access control (MAC) security structure
executed in the kernel. SELinux offers a means of enforcing some security
policies which would otherwise not be effectively implemented by a System
Administrator.
When you install RHEL/CentOS
or several derivatives, the SELinux feature or service is enabled by default,
due to this some applications on your system may not actually support this
security mechanism. Therefore, to make such applications function normally, you
have to disable or turn off SELinux.
Important: If you don’t want to disable SELinux, then you should read
the following articles to implement some mandatory access control on files and
services to function properly.
In this how-to guide, we shall walk
through steps you can follow to check the status of SELinux and also disable it
in CentOS 7/6 and Fedora 18-24, in case it is enabled.
How
can I Disable SELinux in CentOS 7/6 and Fedora 18-24
The first thing to do is to check
the status of SELinux on your system, and you can do this by running the
following command:
$
sestatus

Next, proceed to disabling SELinux
on your system, this can be done temporarily or permanently depending on what
you want to achieve.
Disable
SELinux Temporarily
To disable SELinux
temporarily, issue the command below as root:
#
echo 0 > /selinux/enforce
Alternatively, you can use the setenforce tool as follows:
#
setenforce 0
Else, use the Permissive
option instead of 0 as below:
#
setenforce Permissive
These methods above will only work
until the next reboot, therefore to disable SELinux permanently, move to
the next section.
Disable
SELinux Permanently
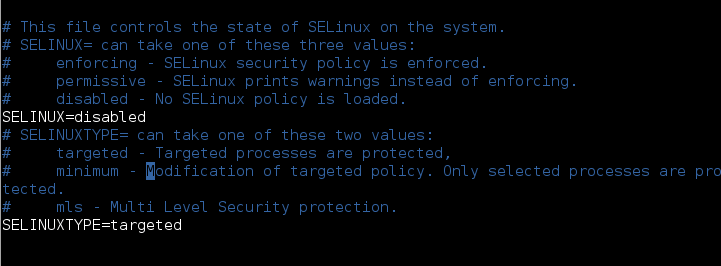
To permanently disable SELinux, use
your favorite text editor to open the file /etc/sysconfig/selinux as follows:
#
vi /etc/sysconfig/selinux

SELinux Enforcing Mode
Then change the directive SELinux=enforcing to SELinux=disabled as shown in the below image.
SELINUX=disabled

Disable SELinux Permanently
Then, save and exit the file, for
the changes to take effect, you need to reboot your system and then
check the status of SELinux using sestatus command as shown:
$
sestatus

Check SELinux Status
In conclusion, we moved through the
simple steps you can follow to disable SELinux on CentOS 7/6. There is nothing
much to cover under this topic but additionally, finding out more about SELinux
can prove helpful especially for those interested in exploring security
features in Linux.
No comments:
Post a Comment